en - Import Feature
The data import feature allows you to add, update, and/or delete data in bulk on the relevant screen. The examples below use Planes as the reference data.
Let's start by exporting
Before importing data in bulk, it may be useful to retrieve the complete file of the current data list.
To perform an export and maintain the link between the data contained in the application and the data in the exported file, an Id column (for identifier) must be added to the exported file.
To do this, a dedicated button is available in the menu at the top right of the data list:

The downloaded file can then be opened in Excel and used as a basis for adding, modifying, or deleting information.

Importing data
Adding new data
To add a new data row (in this example: a new aircraft), simply add a new row to the Excel data list without entering any value in the first column (id).

Modifying data
To modify an existing data row, simply edit the data in the Excel row while keeping the id in the first column.
Deleting data
To delete an existing data row, you can remove the row from the Excel file. If you want to delete a row and create a similar new one, you can also remove the identifier from the first column and modify the columns you want. The absence of the id will cause the row to be considered deleted and a new entry will be created by detecting the row without an identifier.
Importing the Excel file
Once your changes are complete, you can save the Excel file (as a .csv file) and re-import it into the application.
To do this, click on the import button in the menu at the top right of the data list:

The import window will open and ask you to provide some information:
- the file containing the data to import
- the date format used in Excel (day/month/year, month/day/year, or day.month.year)
- the time format used in Excel
- an option to apply the import only to the data currently filtered on the screen
Once this information is provided, click Analyze to read the file and verify data consistency.
Depending on the screens, some features may not be available (add, modify, or delete).
Add
If the add feature is enabled, new rows from the Excel file will appear in the To Add section. This list contains a summary of all new rows (empty identifier) detected and validated in the Excel file.
If you are satisfied with the detected data, you can check the box next to To Add to include these additions when saving.

Modify
If the modify feature is enabled, modified rows from the Excel file will appear in the To Modify section. This list contains a summary of all modified rows detected and validated in the Excel file.
If you are satisfied with the detected data, you can check the box next to To Modify to include these changes when saving.
Delete
If the delete feature is enabled, deleted rows from the Excel file will appear in the To Delete section. This list contains a summary of all deleted rows detected in the Excel file.
If you are satisfied with the detected data, you can check the box next to To Delete to include these deletions when saving.
Error handling
If errors are detected in the Excel file data, the list of these errors will be displayed in the Error(s) section.
Information about the detected error(s) for each row is available in the last column of the table (horizontal scrolling is available if there are many columns).
Example of detected errors during an import:
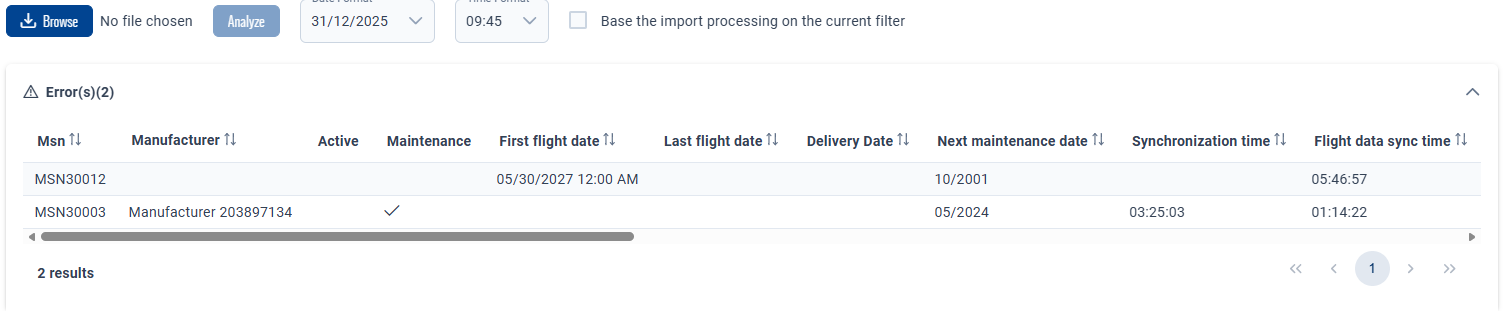
- the required field firstFlightDate (Date of first flight) has not been filled in.
- the format of the nextMaintenanceDate field (Next maintenance date) for this row is incorrect.
Apply changes
Once you are finished, you can apply the changes by clicking the Apply button at the bottom right of the window.