Create your first Relation
We will create a relation between CRUD 'Plane' and option 'PlaneType' (previously created).
Create the relation Entity
- Open with Visual Studio 2022 the solution '...\MyFirstProject\DotNet\MyFirstProject.sln'.
- Open the entity 'Plane':
- In '...\MyFirstProject\DotNet\MyCompany.MyFirstProject.Domain\Plane\Entities' open class 'Plane.cs' and add 'PlaneType' declaration:
/// <summary>
/// Gets or sets the  plane type.
/// </summary>
public virtual PlaneType PlaneType { get; set; }

/// <summary>
/// Gets or sets the plane type id.
/// </summary>
public int? PlaneTypeId { get; set; }
Update Data
Update the ModelBuilder
- In '...\MyFirstProject\DotNet\MyCompany.MyFirstProject.Infrastructure.Data\ModelBuilders', open class 'PlaneModelBuilder.cs' and add 'PlaneType' relationship:
/// <summary>
/// Create the model for planes.
/// </summary>
/// <param name="modelBuilder">The model builder.</param>
private static void CreatePlaneModel(ModelBuilder modelBuilder)
{
    ...
    modelBuilder.Entity<Plane>().Property(p => p.PlaneTypeId).IsRequired(false); // relationship 0..1-*
    modelBuilder.Entity<Plane>().HasOne(x => x.PlaneType).WithMany().HasForeignKey(x => x.PlaneTypeId);
}
Update the DataBase
- Launch the Package Manager Console (Tools > Nuget Package Manager > Package Manager Console).
- Be sure to have the project MyCompany.MyFirstProject.Infrastructure.Data selected as the Default Project in the console and the project MyCompany.MyFirstProject.Presentation.Api as the Startup Project of your solution
- Run first command:
Add-Migration 'update_feature_Plane' -Context DataContext
- Verify new file 'xxx_update_feature_Plane.cs' is created on '...\MyFirstProject\DotNet\MyCompany.MyFirstProject.Infrastructure.Data\Migrations' folder, and file is not empty.
- Update the database when running this command:
Update-DataBase -Context DataContext
- Verify 'Planes' table is updated in the database (column 'PlaneTypeId' was added).
Create the DTO
Using BIAToolKit
- Start the BIAToolKit and go on "Modify existing project" tab*
- Set the projects parent path and choose your project
- Open "DTO Generator" tab
- Generation:
- Choose entity: Plane
- Information message appear: "Generation was already done for this Entity"
- Verify "Domain" value is Plane
- Verify all properties are correctly selected and mapped
- Check the property PlaneType and click on "Map To" button
- New mapping PlaneType with mapping Type "Option" should be added on the list
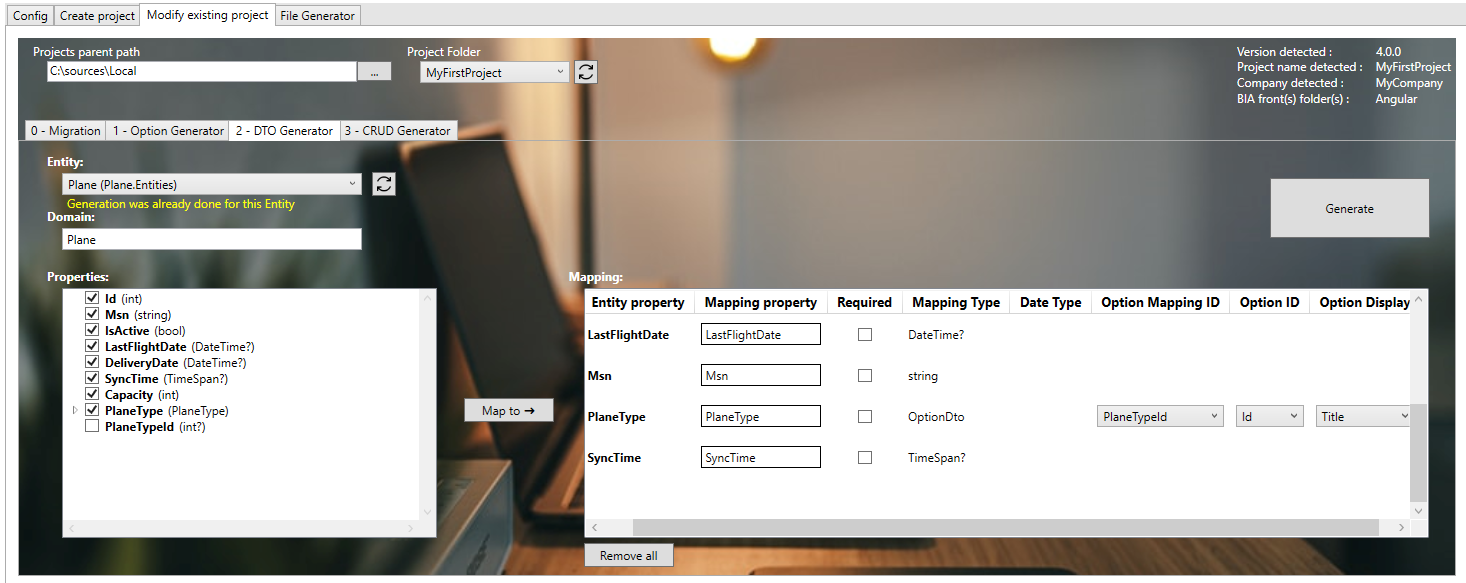
- WARNING : Make sure to have a backup of your previous Mapper before generating
- Click on generate button
Generate CRUD
Using BIAToolKit
- Start the BIAToolKit and go on "Modify existing project" tab*
- Set the projects parent path and choose your project
- Open "CRUD Generator" tab
- Generation:
- Choose Dto file: PlaneDto.cs
- Information message appear: "Generation was already done for this Dto file"
- Verify "WebApi" and "Front" Generation are checked
- Verify "CRUD" Generation Type is choosen
- Verify "Entity name (singular)" value is Plane
- Verify "Entity name (plural)" value is Planes
- Verify "Display item" value is Msn
- On option item list, check "PlaneType" value
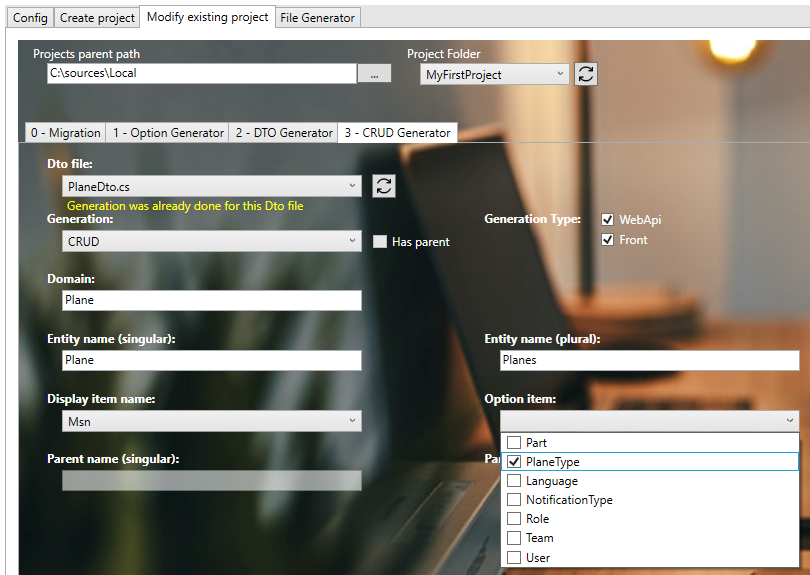
- Click on "Generate" button
Complete generated files
- Update the Mapper 'PlaneMapper':
- Re-add custom code from your previous backup if any
Check DotNet generation
- Return to Visual Studio 2022 on the solution '...\MyFirstProject\DotNet\MyFirstProject.sln'.
- Rebuild solution
- Project will be run, launch IISExpress to verify it.
Check Angular generation
- Run VS code and open the folder 'C:\Sources\Test\MyFirstProject\Angular'
- Launch command on terminal
npm start
Test
- Open 'src/app/shared/navigation.ts' file and update path value to '/planes' for block with "labelKey" value is 'app.planes'
(see 'src/app/app-routing.module.ts' file to get the corresponding path) - Open web navigator on address: http://localhost:4200/ to display front page
- Click on "PLANES" tab to display 'Planes' page.
- Add traduction
- Open 'src/assets/i18n/app/en.json' and add:
  "plane": {
    ...
    "planeType": "Plane Type",
  },
- Open 'src/assets/i18n/app/fr.json' and add:
  "app": {
    ...
    "planes": "Avions",
  },
  "plane": {
    ...
    "planeType": "Type d'avions",
  },
- Open 'src/assets/i18n/app/es.json' and add:
  "app": {
    ...
    "planes": "Planos",
  },
  "plane": {
    ...
    "planeType": "Tipos de planos",
  },
- Open web navigator on address: http://localhost:4200/ to display front page
- Open 'Plane' page and verify label has been replaced and PlaneType option is available on the list